This post is the first part of a two part step by step tutorial on how to migrate a SharePoint 2010 farm to SharePoint 2016.
To read the second part, click here.
Introduction
The SharePoint world is rapidly moving into the Cloud with SharePoint Online and Office 365, but some organizations are still not ready to move completely to Office 365 and SharePoint Online.
Upgrading to SharePoint 2016 or SharePoint 2019 that have support for hybrid scenarios can be a valid solution.
This post is based on upgrading a SharePoint 2010 farm into SharePoint 2016 using the database attach approach but should also be valid if you want to upgrade to SharePoint 2019. This post assumes that the we will only migrate the content database(s) from the source SharePoint 2010 to SharePoint 2016 and all other SharePoint databases are created in the target SharePoint 2016 farm during its installation process.
If you want to learn more about how to install a SharePoint 2016 farm in an automated way using PowerShell, click here and here.
There is another valid migration approach to migrate from SharePoint 2010 to SharePoint 2016 by using a content migration. In this approach, the upgrade is not based in a database upgrade process but on content migration and typically a 3rd party solution is necessary to do the content migration. A few 3rd party solutions that can do the job are ShareGate, AvePoint and Metalogix.
Upgrading a SharePoint farm using the database attach approach can be a complex task and the upgrade process is composed by a series of steps:
- Migrating Custom Developed Solutions from SharePoint 2010 to SharePoint 2016 (outside of the scope of this post)
- Upgrade to a temporary SharePoint 2013 farm
- Upgrade to the target SharePoint 2016 farm
IMPORTANT NOTE: In a typical upgrade process, the below steps should be performed twice if there are custom developed solutions:
- The first time, to test the migration process and allow custom developed solutions to be properly migrated and tested by the end users
- The second time, to perform the final migration, after all custom developed solutions are migrated and tested by the end users
This post will cover:
- Migrating Custom Developed Solutions from SharePoint 2010 to SharePoint 2016
(details about the migration of custom solutions are outside of the scope of this post) - Upgrade to a temporary SharePoint 2013 farm
Migrating Custom Developed Solutions from SharePoint 2010 to SharePoint 2016
This step is outside the scope of this post but a few notes are important to mention if you have custom developed solutions that you want to migrate from SharePoint 2010 to SharePoint 2016:
- First, you should analyze the source SharePoint 2010 farm and look for custom developed solutions and in particular for farm solutions and/or sandboxed solutions
- If custom developed solutions are found and if you want to take the easiest migration path, you could simply upgrade your custom developed solutions to SharePoint 2016 without changing the architecture. This typically involves migrating server-side code from SharePoint 2010 to SharePoint 2016, possible migration of master pages and adjustments to CSS and JS files
- Despite more difficult, if possible, you should consider migrating the existing solutions to one of the following development models:
- SharePoint Framework: the latest and the recommended development model for modern SharePoint solutions, enabling an easier migration path to SharePoint Online and Office 365
- SharePoint Add-Ins: this development model is still supported and can be a valid solution depending on your scenario. However, when possible. you should consider migrating solutions to the SharePoint Framework development model
Upgrade into a temporary SharePoint 2013 farm
IMPORTANT NOTES:
- Migrating from SharePoint 2010 directly to SharePoint 2016 is not supported. To migrate from SharePoint 2010 to SharePoint 2016 we must first migrate to a temporary SharePoint 2013 farm and then migrate to SharePoint 2016
- To to be able to migrate to SharePoint 2016, the temporary SharePoint 2013 farm must at least have the March 2013 Public Update installed. For more details, click here
The migration is performed using the database attach upgrade method (the only supported method to upgrade from SharePoint 2010 to SharePoint 2016 using a database upgrade approach).
In the upgrade process, for both the temporary SharePoint 2013 and the target SharePoint 2016 farms, you should create an empty web application so that a valid SharePoint content database is created. To learn more on how to install a SharePoint 2016 farm (process also valid for SharePoint 2013), click here and here.
After having all custom developed solutions migrated to SharePoint 2016 (if there are any), you should follow the following steps:
- SharePoint 2010 (test migration only): Export all WSPs from the SharePoint 2010 farm to file system. To export the WSP files, you can use this PowerShell script.
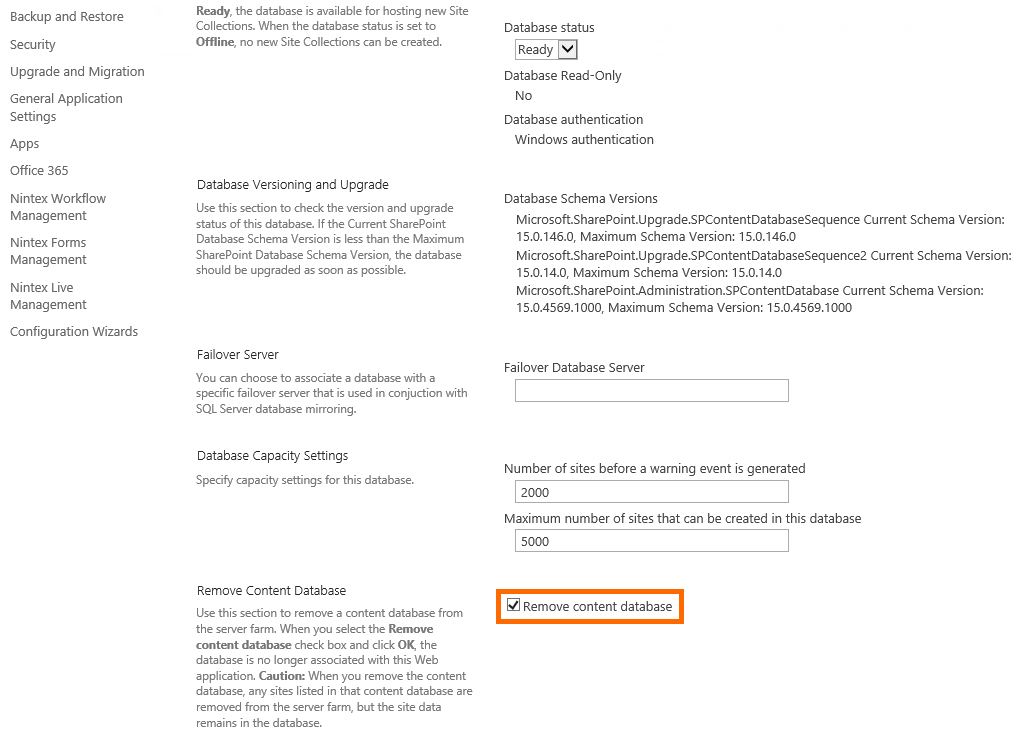
SharePoint 2010 (final migration only): Go to “Manage content databases” in Central Administration, select the web application and then the option “Remove content database”. This will temporarily make the web application unavailable in the source SharePoint 2010 farm

- SharePoint 2010 Database Server (final migration only): Place the database in read-only mode to ensure the source web application is made available again and so that users cannot change content anymore during the upgrade process. This can be achieved by the following T-SQL command: ALTER DATABASE <CONTENT_DB_NAME> SET read_only
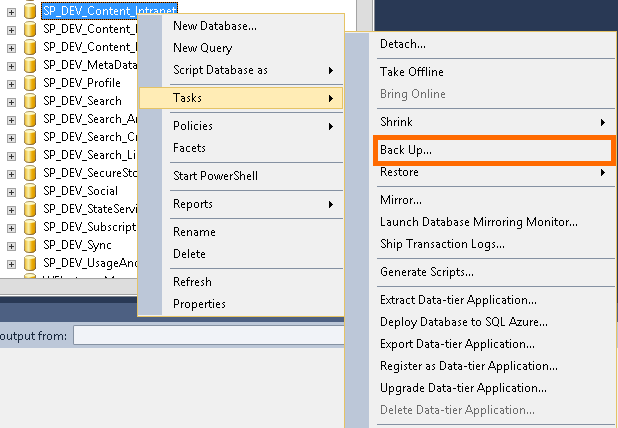
- SharePoint 2010 Database Server: Backup of the content database(s) (in read-only mode in the final migration)

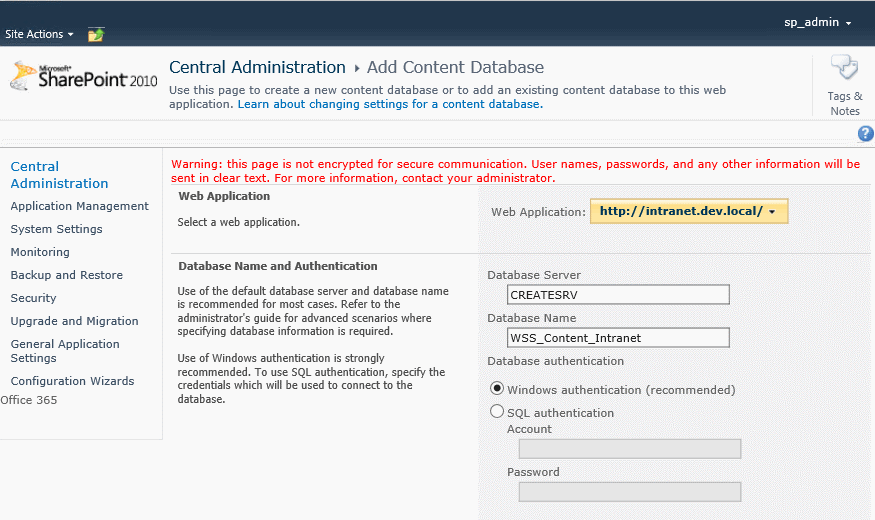
- SharePoint 2010 (final migration only): Go to “Manage content databases” in Central Administration, select the web application, then the option “Add content database” and finally select the name of the content database previously removed. This will make the web application available again in the source SharePoint 2010 farm in read-only mode, preventing users from changing any content



- SharePoint 2013 Database Server: Copy the database backup file from the source SharePoint 2010 database server to the database server that supports the temporary SharePoint 2013 farm
- SharePoint 2013: Go to “Manage content databases” in Central Administration, select the web application where you want to migrate to and then the option “Remove content database”. This will make the database unattached from any web application.

- SharePoint 2013 Database Server: Restore the content database backup from the source SharePoint 2010 database server. The restore must replace the content database that was created during the SharePoint 2013 installation.
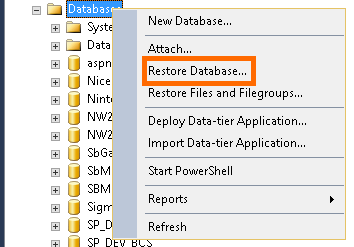

- SharePoint 2013: If you have custom developed farm solutions, add all the exported WSPs (without deploying them) in the temporary SharePoint 2013 farm. For each WSP, run the following command:
- Add-SPSolution -LiteralPath $location\solution.wsp where $location is the file system location of the WSP files
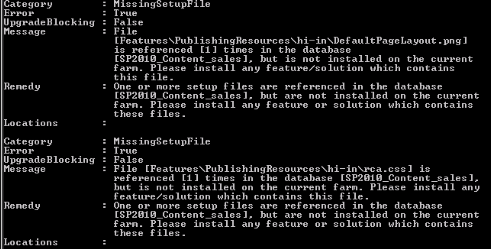
- SharePoint 2013: Execute the first of a series of PowerShell commands to associate the restored content database to the temporary SharePoint 2013 farm (in this example the web application URL is http://sp2013): Test-SPContentDatabase -Name <Content_DB_Name> -WebApplication http://sp2013
- This PowerShell cmdlet will test the content database against the web application to verify if all customizations referenced within the content database are also installed in the farm
- In my case, I got some missing features errors but none of them are upgrade blocking

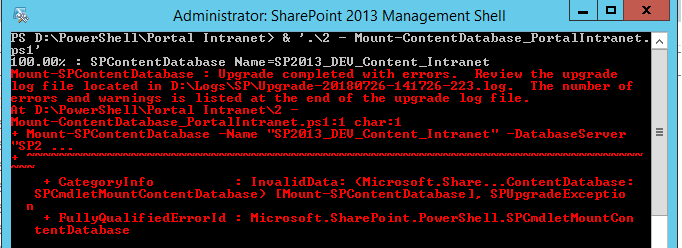
- SharePoint 2013: Execute the second of a series of PowerShell commands to associate the restored content database to the temporary SharePoint 2013 farm: Mount-SPContentDatabase -Name “<Content_DB_Name>” -DatabaseServer “<DBAlias>” -WebApplication “http://sp2013”
- This PowerShell cmdlet attaches an existing content database to a web application
- In my case, I got an error that once again was not upgrade blocking. This cmdlet is very likely to throw an error but most times it is an error that will not block the upgrade process

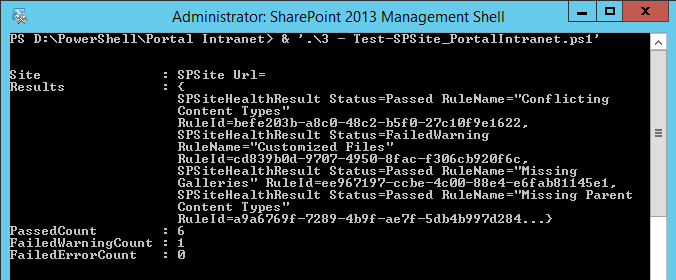
- SharePoint 2013: Execute the third of a series of PowerShell commands to associate the restored content database to the temporary SharePoint 2013 farm: Test-SPSite http://sp2013
- This PowerShell cmdlet runs a series of health checks on the site collection and its contents
- In my case, I got a warning but once again nothing that is upgrade blocking

- SharePoint 2013: Execute the fourth of a series of PowerShell commands to associate the restored content database to the temporary SharePoint 2013 farm: Repair-SPSite -identity http://sp2013
- This PowerShell cmdlet is similar to the Test-SPSite cmdlet but fixes any issues that it finds
- The result was identical to the Test-SPSite cmdlet: no upgrading blocking issues were found
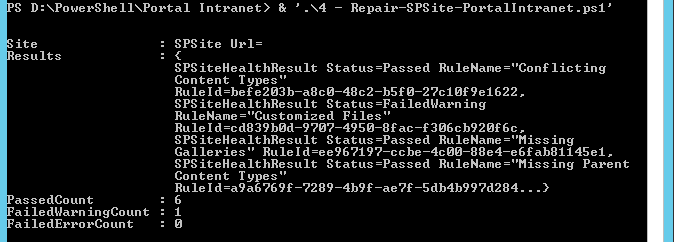

- SharePoint 2013: Execute the fifth of a series of PowerShell commands to associate the restored content database to the temporary SharePoint 2013 farm: Upgrade-SPSite http://sp2013 -VersionUpgrade
- This PowerShell cmdlet will upgrade the site collections associated to the web application to SharePoint 2013 mode. Before this cmdlet was executed, the site collections were still in SharePoint 2010 mode.


To read the second part of this two part step by step tutorial, click here.
Related Articles
If you want to convert your tenant’s root classic site into a modern SharePoint site, click here.
To learn why your business should migrate to SharePoint Online and Office 365, click here and here.
If you are a SharePoint administrator or a SharePoint developer who wants to learn more about how to install a SharePoint 2019 farm in an automated way using PowerShell, I invite you to click here and here.
If you want to learn how to upgrade a SharePoint 2013 farm to SharePoint 2019, click here and here.
If you want to learn all the steps and precautions necessary to successfully keep your SharePoint farm updated and be ready to start your move to the cloud, click here.
If you learn how to greatly speed up your SharePoint farm update process to ensure your SharePoint farm keeps updated and you stay one step closer to start your move to the cloud, click here.
If SharePoint 2019 is still not an option, you can learn more about how to install a SharePoint 2016 farm in an automated way using PowerShell, here and here.
If you are new to SharePoint and Office 365 and want to learn all about it, take a look at these learning resources.
If you are work in a large organization who is using Office 365 or thinking to move to Office 365 and is considering between a single or multiple Office 365 tenants, I invite you to read this article.
If you want to know all about the latest SharePoint and Office 365 announcements from SharePoint Conference 2019, click here and here.
If your organization is still not ready to go all in to SharePoint Online and Office 365, a hybrid scenario may be the best choice. SharePoint 2019 RTM was recently announced and if you to learn all about SharePoint 2019 and all its features, click here.
Happy SharePointing!


![[FIX] BizTalk Server 2010, 2013, 2013 R2 & 2016 errors “Class not registered (WinMgmt)” or “Access denied”](https://blogit.create.pt/wp-content/uploads/2018/07/access-black-and-white-blur-270514-218x150.jpg)
