

” or “Access denied”")


 Learning Guide")


 in SharePoint Online Modern Pages")


This post explains how we can enable the possibility, in Microsoft Teams, for Meeting Organizers to download the meeting attendance list to Excel to retrieve the list of all attendees that were present in a meeting.
Introduction
Recently, someone asked me if it was possible to export a Microsoft Teams Meeting Attendance List to Excel while in the meeting!
My first reaction was that I hadn’t seen that possibility in my tenant and that probably this wasn’t possible. The truth is that Microsoft Teams has added a new feature that allows organizers to download and view the attendees that are present in a meeting. However, this option is not enabled by default.
After googling a bit, I found a Microsoft support article that pointed me in the right direction.
Pre-Requisites and How-To Steps
Unfortunetaly, this configuration isn’t available in Teams Admin Center and in order to enable this meeting policy, we have to use PowerShell.
Pre-Requisites
The first step is to install Microsoft Teams and Skype for Business PowerShell modules:
- Microsoft Teams – just run the following command in a PowerShell console: Install-Module MicrosoftTeams
- Skype for Business: download and install the PowerShell Module (update 26/07/2021: no longer necessary)
How-To Steps
After installing the required PowerShell modules, we are ready for the fun part! Just run the PowerShell commands below (ensure that you run using the “Run as Adminstrator” option). In my example, I will change the Global meeting policy, that can make sense if we want to enable this policy for all users but you may want to create a new policy instead if we want to enable meeting attendance download to a restricted set of users. Check this Microsoft article for details.
- Import-Module SkypeOnlineConnector
- Connect-MicrosoftTeams
This step will allow ask for credentials of a Global Admin user. This authentication method works fine if you have Multi-Factor Authentication enabled (MFA) in your tenant.
- $sfbSession = New-CsOnlineSession
- Import-PSSession $sfbSession
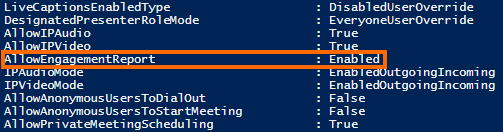
Lines 3 and 4 are required to avoid an error saying Get-CsTeamsMeetingPolicy is not available in the next command. - Get-CsTeamsMeetingPolicy -Identity “Global”
After running this command, we can see that the “AllowEngagementReport” property which enables/disables the meeting attendance download is disabled.
- Set-CsTeamsMeetingPolicy -Identity “Global” -AllowEngagementReport Enabled
This command will enable the the meeting attendance download - Get-CsTeamsMeetingPolicy -Identity “Global”

After running this command, we can see that the “AllowEngagementReport” property is now enabled.
Testing The Results
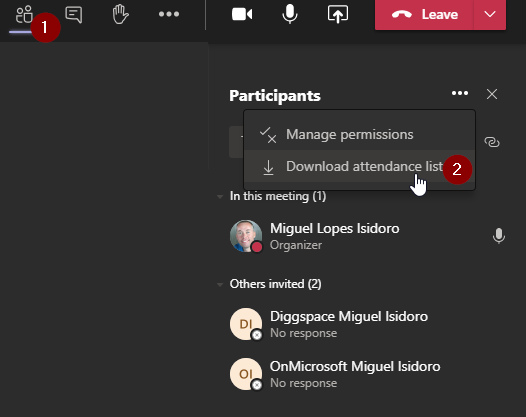
To test if the configuration was successful, just schedule a meeting and check if while in the meeting, you are able to download the meeting attandance list.
You now should have a new option named “Download attendance list” and you should be able to download the meeting’s attendance list. The list will contain all users that are effectively attending the meeting and will not contain the attendees that were invited that are not attending the meeting, even if they accepted the meeting request.
Related Articles
To learn why your business should migrate to SharePoint Online and Office 365, click here and here.
If you want to learn how you can rename a modern SharePoint site, click here.
If you want to learn how to save time time scheduling your meetings, click here.
If you want to modernize your SharePoint classic root site to a modern SharePoint site, click here.
If you want to learn how to create a dynamic org-wide team in Microsoft Teams with all active employees, click here.
If you are a SharePoint administrator or a SharePoint developer who wants to learn more about how to install a SharePoint 2019 farm in an automated way using PowerShell, I invite you to click here and here.
If you learn how to greatly speed up your SharePoint farm update process to ensure your SharePoint farm keeps updated and you stay one step closer to start your move to the cloud, click here.
If you prefer to use the traditional method to update your farm and want to learn all the steps and precautions necessary to successfully keep your SharePoint farm updated, click here.
If you want to learn how to upgrade a SharePoint 2013 farm to SharePoint 2019, click here and here.
If SharePoint 2019 is still not an option, you can learn more about how to install a SharePoint 2016 farm in an automated way using PowerShell, click here and here.
If you want to learn how to upgrade a SharePoint 2010 farm to SharePoint 2016, click here and here.
If you are new to SharePoint and Office 365 and want to learn all about it, take a look at these learning resources.
If you are work in a large organization who is using Office 365 or thinking to move to Office 365 and is considering between a single or multiple Office 365 tenants, I invite you to read this article.
If you want to know all about the latest SharePoint and Office 365 announcements from Ignite and some more recent announcements, including Microsoft Search, What’s New to Build a Modern Intranet with SharePoint in Office 365, Deeper Integration between Microsoft Teams and SharePoint and the latest news on SharePoint development, click here.
If your organization is still not ready to go all in to SharePoint Online and Office 365, a hybrid scenario may be the best choice. SharePoint 2019 RTM was recently announced and if you to learn all about SharePoint 2019 and all its features, click here.
Happy Scheduling!


Had issue running the New-CsOnlineSession due to missing DNS record for lyncdiscover. Found a way to override by using New-CsOnlineSession -OVerrideAdminDomain yourTenantName.onmicrosoft.com in case anyone else runs into this issue.
Thanks for sharing Jason!
Hello, I had the same error as Jason Adams mentioned (issue running the New -CsOnlineSession). I tried also the “‘New-CsOnlineSession -OVerrideAdminDomain yourTenantName.onmicrosoft.com” solution, but get an error: “The WinRM client cannot process the request. Basic authentication is currently disabled in the client configuration. Change the client configuration and try the request again.”
Any idea what this could be?
Hello Koen,
Unfortunately no, since in my case, I modified the default policy.
Take a look at https://community.spiceworks.com/topic/2228883-powershell-wrm-error-while-connecting-exo-powershell, hope it helps!
Thanks,
Miguel
The simplest explanation i have seen yet. I have followed others and never been able to get it. I think they were all missing steps 3 and 4. So…Thank you!!
Thanks a lot for your feedback. Glad it helped!
Hi!
I followed your instructions step by step, except “[…] download and install the PowerShell Module […]” and step 1, because the link you provided for the download leads to a 404 page.
It seems that module is no longer needed, and so it worked all right, and I’m grateful.
Thank you!
Hello Isabel,
Thank you (obrigado 🙂 ). I’ve updated the post.
Glad the post helped you.
Thanks
Miguel