This post explains how you can configure a web application holding host named site collections to use HTTPS and automatically redirect HTTP redirects to HTTPS in a SharePoint 2019 farm. This post will focus on HTTPS configuration on SharePoint site, IIS bindings, Alternate Access Mappings, Search and how you can automatically redirect pages from HTTP to HTTPS.
Introduction
I am currently involved in a SharePoint 2013 to SharePoint 2019 migration of a public website solution using SharePoint 2013. Despite WCM features in SharePoint have not evolved since SharePoint 2013, the option was to upgrade to SharePoint 2019 and take advantage of existing developments.
The solution uses Host Named Site Collections as the basis for a multi portal platform that can be used to create multiple public sites with the same platform, making it easy to create multiple portals with little development effort.
This post explains the configurations necessary to configure a Host Named Site Collection using HTTPS and how to automatically redirect HTTP requests to HTTPS.
To learn more on Host Named Site Collections, you can read the Microsoft official documentation or read a fantastic blog post about the topic.
In my case, I will assume the existence of a web application that acts as the container for the site collections. To simplify, lets assume the following configuration (web application and site collection were created using HTTP first).
- Web application URL (Default Zone): http://webapp.smartportals.pt, configured for anonymous access. This address will never be used by end users. This is the web application URL that was given to the web application when it was created. In this zone, we will automatically redirect HTTP to HTTPS in every page.
- Web application URL (Intranet Zone): http://auth.smartportals.pt, configured for Windows Integrated access only. This zone will be used as an authoring environment for content managers. However, this address will never be used by end users. This web application URL was created using a web application extension into the Intranet zone, which created a new IIS site for the same web application but to be used with different authentication settings. In this zone, we will also automatically redirect HTTP to HTTPS in every page.
- Web application URL (Internet Zone): http://search.smartportals.pt, configured for Windows Integrated access and anonymous access. This zone will be used only for search. This address will never be used by end users. This web application URL was created using a web application extension into the Internet zone. In this zone, we will NOT automatically redirect HTTP to HTTPS in every page since this will cause search issues when crawling the site collection (http://dev.site.pt) contents.
- Site collection URL (Default Zone): http://dev.site.pt, configured for anonymous access. This address will be used by end users to access the public website. The site collection was created a PowerShell script. To learn more on how to create a Host Named Site Collection, please read the Microsoft official documentation.
- Site collection URL (Intranet Zone): http://auth.site.pt, configured for Windows Integrated authentication. This address will be used by BackOffice users to manage content of the website.
How-To Steps
When configuring SSL in a SharePoint 2019 farm with Host Named Site Collections, the following topics are the most relevant:
- Install SSL certificates
- Configure Search
- Configure IIS bindings
- Configure Alternate Access Mappings
- Configure Anonymous Access for Public Web Site
- Configure Site Collection URLs
- Configure Web Application Authentication Providers
- Configure HTTP to HTTPS Automatic Redirect
Install SSL certificates
The SSL certificate must be a wildcard certificate for the same domain as the public address of the web site. I will not focus on this topic in the post since it is very well explained over the Internet. The SSL certificates will have to be installed in every SharePoint Frontend server. To learn more on this topic, please visit this blog post. In our case, we used a wildcard certificate issued by a known certificate authority.
Configure Search
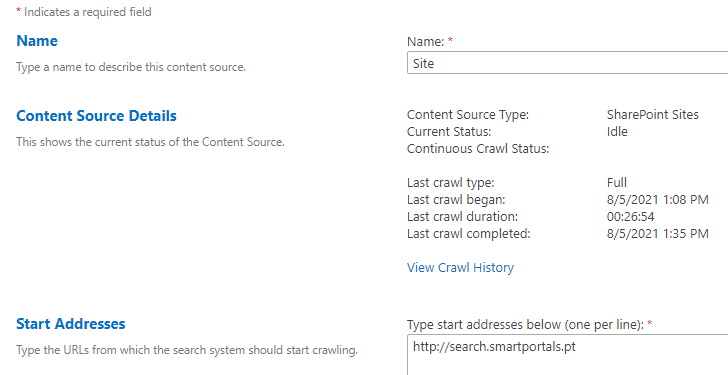
As you remember, both in the Default and Intranet zones, we have automatic redirection between HTTP and HTTPS. The way we configured this redirect will be explained later in the post. In order for the Search Service Application to successfully crawl the site collection (http://dev.site.pt, at this point still in HTTP) contents successfully, we must set as the Search Content Source the Web Application URL for the Internet zone (http://search.smartportals.pt). The IIS site in the Internet zone WILL NOT have any automatic redirection between HTTP and HTTPS (only the IIS sites associated with the public website and the Authoring URLs will). For crawling purposes, the web application in this zone can use the HTTP protocol since, once again, the web application URL acts as a container and will never be accessed directly by end users. While crawling, the HTTPS address of the site collection (https://dev.site.pt) will be crawled successfully since it will later be the site collection URL associated with the Default zone of the web application. The reason, once again for this, is that in the Internet zone there is no HTTP to HTTPS automatic redirection in the IIS site associated with the URL used as a Content Source URL: http://search.smartportals.pt.
In our case, we created two content sources, one for the website and left the default Content Source with the remaining start addresses, used mainly to crawl user profiles.


Configure IIS bindings
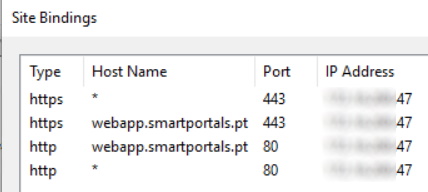
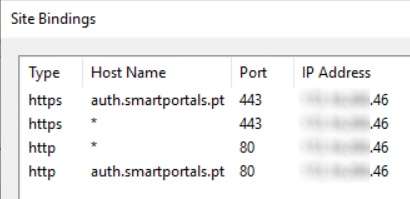
In each frontend server, you will have to have two different IP Addresses. This is necessary since we need two IIS sites accepting wildcard certificates and the only way we can achieve this is having two different IP Addresses in the server, and have the bindings in the Public and Authoring IIS web sites to use different IP Addresses. These two IIS sites (Default and Intranet zones) will have automatic redirect between HTTP and HTTPS and will have both the HTTP and HTTPS bindings. We decided to stay with the default ports, even for the Public and Authoring web sites for simplicity.
Default zone (Public website, anonymous access):

Intranet zone (Authoring website, Integrated Windows Authentication):

Search zone (Search IIS site, Integrated Windows Authentication and Anonymous Access):


Configure Alternate Access Mappings
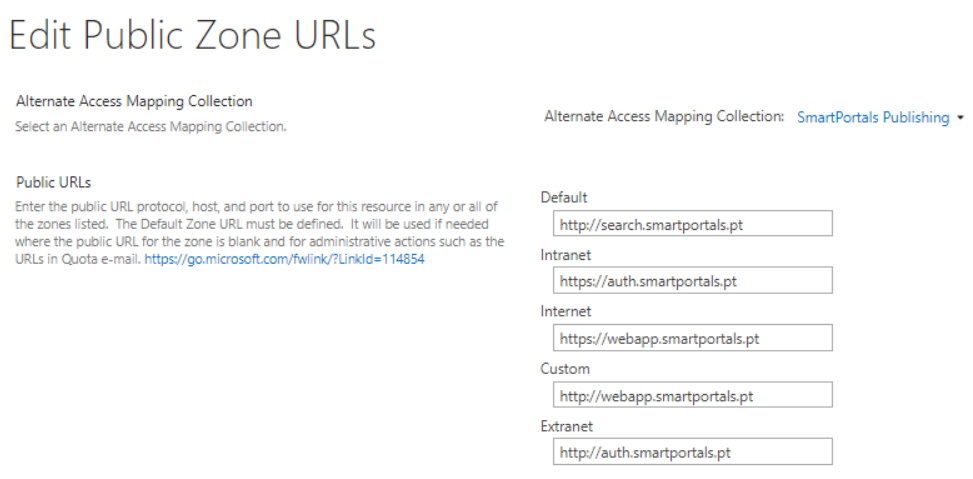
Alternate Access Mappings are an essencial part on any web application configuration and will play a very important role in our configuration. Each web application can have up to 5 different Public URLs that can be used to have users access the same web application using different addresses and potentially different authentication providers (Default, Intranet, Internet, Extranet and Custom). To learn more about Alternate Access Mappings, read the official Microsoft documentation.
Important Notes:
- Search IIS site address must be the default zone URL. To read more about the advantages of doing this, read the Official Microsoft documentation. With Host Named Site Collections, the Site Collection that we want to crawl must also be configured for the Default zone so that the search results will always return results starting with that URL (in our case https://dev.site.pt)
- The HTTPS web application URL set in the Authoring IIS site must be set to the Intranet zone since we will configure the Authentication provider in this zone for Windows Integrated Authentication only to ensure that only authenticated users can access this address.
- The HTTPS web application URL set in the Public IIS site must be to the Internet zone since this is the zone where we will configure the authentication provider with Windows Integrated Authentication and anonymous access so that users can access the site collection URL (in our case https://dev.site.pt).
- The remainder zones are for the HTTP addresses of the Public and Authoring IIS sites

Configure Anonymous Access for Public Web Site
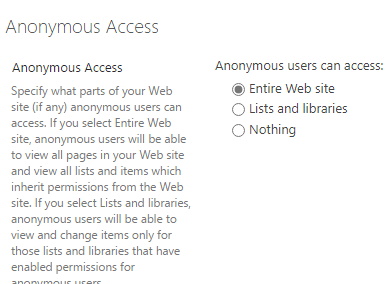
To complete the configuration of anonymous access, you have to go to SharePoint permissions page (using the public address but as an authenticated user) and set anonymous access.

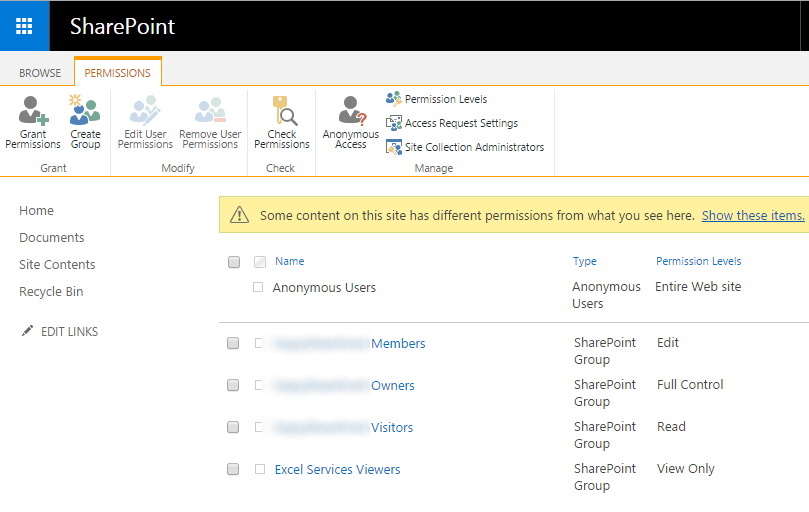
After anonymous access has been enabled, you have something like the below image in your Site Collection permissions.

Configure Site Collection URLs
In this section, we will configure the different site collection URLs for the relevant zones configured in the Alternate Access Mappings in the previous section.
To do this, we must use rename the http://dev.site.pt to https://dev.site.pt (Default zone) using old STSADM.
stsadm -o renamesite -oldurl http://dev.site.pt -newurl https://dev.site.ptAfter that, we can set the remain zones URLs using SP-SiteURL PowerShell cmdlet as follows:
Set-SPSiteUrl (Get-SPSite 'https://dev.site.pt') -Url 'https://auth.dev.site.pt' -Zone Intranet
Set-SPSiteUrl (Get-SPSite 'https://dev.site.pt') -Url 'http://dev.site.pt' -Zone Internet
Set-SPSiteUrl (Get-SPSite 'https://dev.site.pt') -Url 'http://auth.dev.site.pt' -Zone Extranet
If you need to remove any Site Collection URL, you can set use the Remove-SPSiteURL as follows:
Remove-SPSiteURL -Url http://auth.dev.site.ptAfter running the commands, we will have our HTTPS Public web site address (the one we want for Search) in the Default zone and the remaining zones set to allow the Public site web site access (HTTP and HTTPS) to be anonymous and the Authoring address to require Windows Integrated Authentication.


Configure Web Application Authentication Providers
Authentication Providers are associated with the security zones of the web application (Default, Intranet, Internet, Extranet and Custom). To learn more about Authentication Providers, please read the Microsoft official documentation.
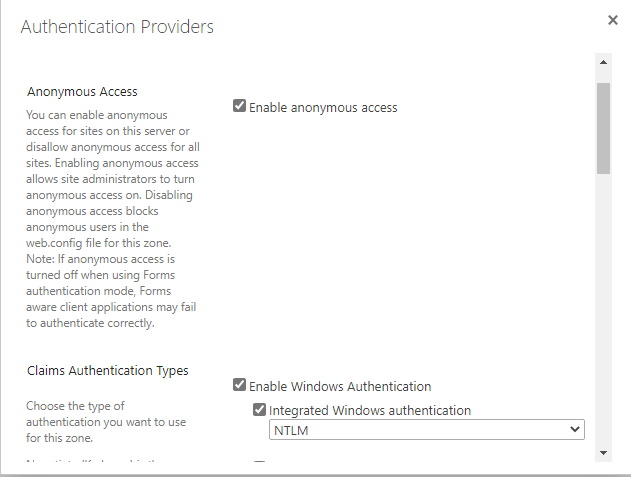
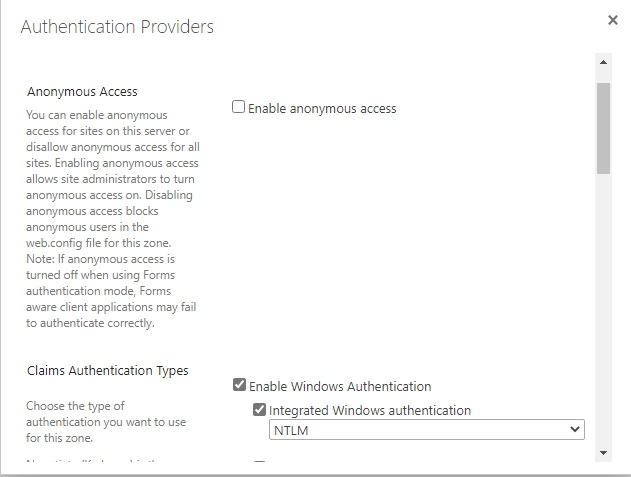
For the Default and Internet zones, we set anonymous access and Windows Integrated Authentication. Default zone will allow temporarily Windows Integrated Authentication so that we can properly set Anonymous Access in the Site Collection (already explained above). The Windows Integrated Authentication setting should be removed in the end to prevent authenticated users to try accessing the Public web site as authenticated users. Internet zone must also include Windows Integrated Authentication so that the Search can properly crawl the Site Collection contents.


Configure HTTP to HTTPS Automatic Redirect
Since this is a migration from a SharePoint 2013 site using HTTP to a SharePoint 2019 using HTTPS we want to ensure if we have HTTP links in any page of the website and while Google is indexing the new site after migration is complete, that HTTP requests will be automatically redirected to HTTPS.
To achieve this, we installed on each of the SharePoint Frontend Servers, the IIS URL Rewrite module.
After installed, we must add the following XML configuration on the web.config on the IIS sites associated with the Default and Intranet zones (Public and Authoring web sites).
    <staticContent>
      <remove fileExtension=".dll" />
      <remove fileExtension=".exe" />
    </staticContent>
    <rewrite>
      <rules>
        <rule name="Redirect to HTTPS" enabled="true" patternSyntax="Wildcard" stopProcessing="true">
          <match url="*" negate="false" />
          <conditions logicalGrouping="MatchAny">
            <add input="{HTTPS}" pattern="off" />
          </conditions>
          <action type="Redirect" url="https://{HTTP_HOST}{REQUEST_URI}" redirectType="Found" />
        </rule>
      </rules>
    </rewrite>
 </system.webServer>
And that’s it! Hope that this can help anyone that needs to do something similar! Any feedback and suggestions to improve to the configuration we used is welcome!
Related Articles
To learn why your business should migrate to SharePoint Online and Office 365, click here and here.
If you want to learn how you can rename a modern SharePoint site, click here.
If you want to learn how to save time time scheduling your meetings, click here.
If you want to learn how to enable Microsoft Teams Attendance List Download, click here.
If you want to learn how to create a dynamic org-wide team in Microsoft Teams with all active employees, click here.
If you want to modernize your SharePoint classic root site to a modern SharePoint site, click here.
If you are a SharePoint administrator or a SharePoint developer who wants to learn more about how to install a SharePoint 2019 farm in an automated way using PowerShell, I invite you to click here and here.
If you learn how to greatly speed up your SharePoint farm update process to ensure your SharePoint farm keeps updated and you stay one step closer to start your move to the cloud, click here.
If you prefer to use the traditional method to update your farm and want to learn all the steps and precautions necessary to successfully keep your SharePoint farm updated, click here.
If you want to learn how to upgrade a SharePoint 2013 farm to SharePoint 2019, click here and here.
If SharePoint 2019 is still not an option, you can learn more about how to install a SharePoint 2016 farm in an automated way using PowerShell, click here and here.
If you want to learn how to upgrade a SharePoint 2010 farm to SharePoint 2016, click here and here.
If you are new to SharePoint and Office 365 and want to learn all about it, take a look at these learning resources.
If you are work in a large organization who is using Office 365 or thinking to move to Office 365 and is considering between a single or multiple Office 365 tenants, I invite you to read this article.
If you want to know all about the latest SharePoint and Office 365 announcements from Ignite and some more recent announcements, including Microsoft Search, What’s New to Build a Modern Intranet with SharePoint in Office 365, Deeper Integration between Microsoft Teams and SharePoint and the latest news on SharePoint development, click here.
If your organization is still not ready to go all in to SharePoint Online and Office 365, a hybrid scenario may be the best choice. SharePoint 2019 RTM was recently announced and if you to learn all about SharePoint 2019 and all its features, click here.
Happy SharePointing!


![[FIX] BizTalk Server 2010, 2013, 2013 R2 & 2016 errors “Class not registered (WinMgmt)” or “Access denied”](https://blogit.create.pt/wp-content/uploads/2018/07/access-black-and-white-blur-270514-218x150.jpg)
